Working with Requests
- Tristan Mohn (Deactivated)
- Victoria Buhler (Deactivated)
- Igor Bogdanovski (Deactivated)
Benefits
Evidence requests, just called "requests" in ZenGRC, are created to provide evidence surrounding the effectiveness of controls. They are typically imported during the audit creation process and assigned to users who are to provide documents or links describing how the control assists with compliance.
Requests are key in the audit setup process and can be accessed directly from the Audits module, the System of Record, and the To-Do List.
Overview
This documentation highlights additional functionality that audit managers or administrators may need. For streamlined steps on how to finish your portion of an assignment, please see Quick Tips for Tasks and Requests.
Accessing Requests from Audits
Audit managers and those with additional permissions can access requests from the Audits module.
To view and respond to a request from the Audit summary page, complete the following steps:
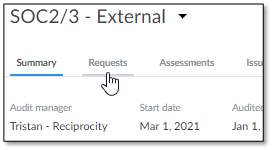
Click the Requests tab.
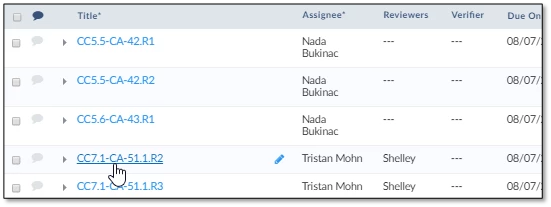
Find the request and click the link in the Title column.
TIP
You can sort, add headings, and export data on this page in the same way as on a module's home page. For more information, please see System of Record List Views.
Accessing Requests Through the System of Record
To access requests, complete the following steps:
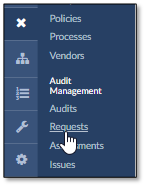
- Click System of Record | Requests.
- The Requests page displays showing all existing requests.
Accessing Requests from the To-Do List
Those with limited permissions who are assigned requests only have access to them from their to-list.
NOTE
For additional information, please see To-Do List.
The Request Workflow
The workflow of evidence requests can be set up in many ways. To further your understanding, please see Workflow for Requests and Tasks.
Submitting, Reviewing, and Verifying Information
After opening the request from the To-Do List and Audits, For streamlined steps on how to finish your portion of a request, please see Quick Tips for Tasks and Requests.
Importing Additional Requests
Requests are imported during audit creation, but they can still be added after an audit has been created and activated.
Single Requests
To create a single request from the Audit summary page, complete the following steps:
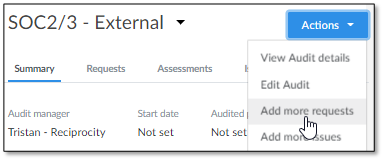
- Click Actions | Add more requests.
- The page displays for creating a new request. Note that the new request defaults to the audit that was displaying when you clicked the Actions dropdown.
- After completing the fields, click Save to save the request and close the window.
- Alternatively, click Save & Add Another to continue creating new requests.
Import Requests
To import a spreadsheet of requests from the Audit summary page, complete the following steps:
- Click Actions | Edit Audit.
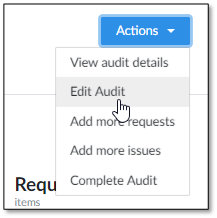
- The page displays the first step in audit creation.
- Click the Requests icon at the top.
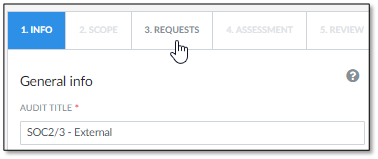
The page refreshes for you to import requests or create them individually.
NOTE
For additional instructions, please see Step 3: Setting up Audit Requests.
After import and conducting any mapping necessary, click Save & Close in the lower, left corner to close the window and return to the Audits home page.

Assigning Requests to a Different Audit
If a request needs to be reassigned to another audit, the best way to do this is by changing the Audit field on the Details tab, not through the Mapped Objects tab.
To assign a request to a different audit, complete the following steps:
- Open the request.
- Click the pencil beside the Audit field.
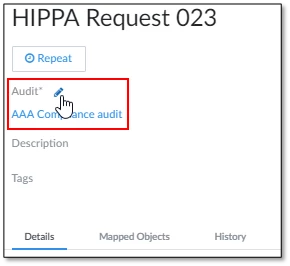
- In the dialog box, click the Audit drop-down and select the appropriate audit.
- Click Save.
Filtering Requests in Audits
You can narrow requests displayed by utilizing the filter functionality that separates statuses.
To filter requests by status, complete the following steps:
- Click one of the boxes displaying a request status.
- All - This displays all requests regardless of status and is the default.
- Open - This displays requests that are waiting to be completed and are within the requested time frame.
- Submitted -This shows the initial assignee added evidence to the request and submitted it. If there is a reviewer, the request is now that user's To-Do List.
- Reviewed -This means the reviewer has accepted the evidence and it is waiting for the verifier's input. This status only displays when there's a reviewer and verifier.
- Completed - This shows the requests that have been filled and are closed.
- The page refreshes with results.
Exporting Evidence Requests
The evidence gathered and submitted in a request can be exported for external auditors or any other reviewers your organization may have. The export can be formatted as a CSV or as a zip file with attachments inside.
NOTE
For instructions on exporting, please see the To-Do List or Managing Audits, depending on the module in which you are working.
Setting Up Recurrence
Requests, assessments and tasks can be set up to repeat on a monthly, quarterly, semi-annual, and annual basis.
NOTE
Setting up recurrence is the same for requests, assessments and tasks. For more information, please see Setting Recurrence on Action Items
© 2021 Copyright Reciprocity, Inc.
https://reciprocity.com