Actions on the Details Page
- Tristan Mohn (Deactivated)
- Victoria Buhler (Deactivated)
Overview
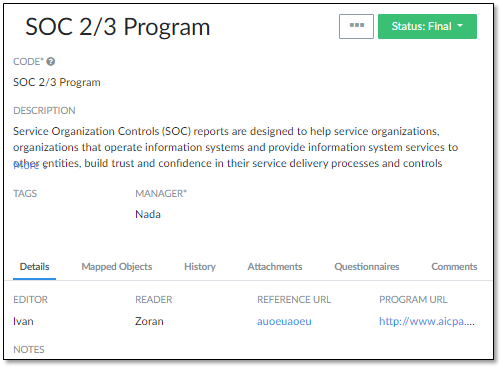
Once an item is opened from a module's home page, it defaults to that item's Details tab. So this initial view of the page is called the Details page. In addition, there are other tabs containing additional fields to view and edit.
Example: If you need to view questionnaire results for an item or change an audit's start date, you can do that on an item's details page by following the actions in this tutorial.
Accessing the Details Page
NOTE
The example below opens the details page from the Programs home page. For instructions on how to access a module's home page, please see System of Record List Views.
To access details of an object from a module's home page, complete the following steps:
- Click a linked item in the Title column.

The details page displays with the default opening on the Details tab.
Navigation
When you open an action item in the To-Do List or from the Audits module, it displays in a new window on top of the existing page. This provides a way to keep your place in the application.
In addition, forward and back arrows allow clicking to the next assignment without closing each item.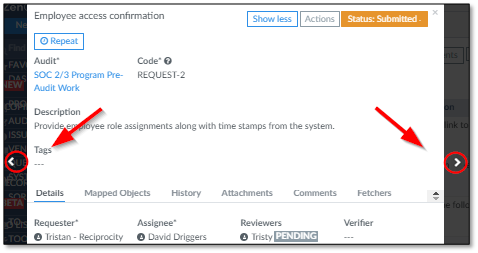
Modules other than the To-Do List and Audits open the details page with a link at the top to return to the object's home page as shown in the screenshot below.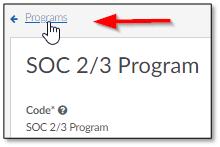
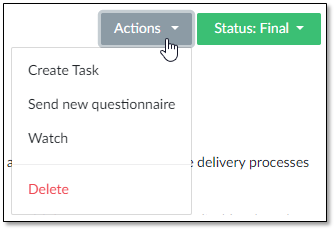
Actions
The Actions dropdown displays on every object. However, depending on the resolution of your monitor and the width of your browser, the wording varies.
Maximum Width
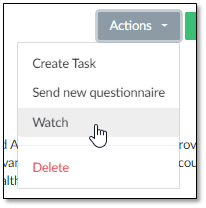
When your browser is maximized, the button says Actions with various dropdown options, depending on the ZenGRC module displayed.
Minimum Width
When your browser is minimized or on low resolution, the Actions button displays as an ellipsis, instead. The dropdown selections are the same as the maximum width and depend on the ZenGRC module displayed.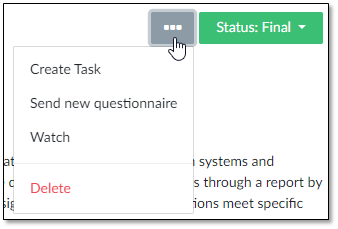
Watching Items
Users can set themselves up to "watch" any item in the ZenGRC System of Record. Anytime a watched item changes status, those who have signed up as watchers receive a notification.
- Example - Risk managers can monitor assessments, controls, systems, facilities, and audits to understand statuses at all times.
- Example - The task/request creators can track progress on items without assigning themselves as a reviewers or verifiers.
NOTE
A recurring item does not automatically add watchers to the cloned items. You will need to open each subsequent item and set up the watch.
To watch an item, complete the following steps:
- Open an item's details page.
- Click the ellipsis | Watch. If your monitor is at full screen, the ellipsis is replaced by the word Actions.
To remove the watch, complete the following steps:
- Open an item's details page.
- Click the ellipsis | Stop watch. If your monitor is at full screen, the ellipsis is replaced by the word Actions.
Statuses
Each object has different status selections depending upon the actions required. The dropdown is found on the top, right corner. For additional information, see the documentation for each object.
Tab Overview
There are other tabs on the page that provide valuable information and functionality. Depending on the object type that is opened, there may be differences in the fields displayed.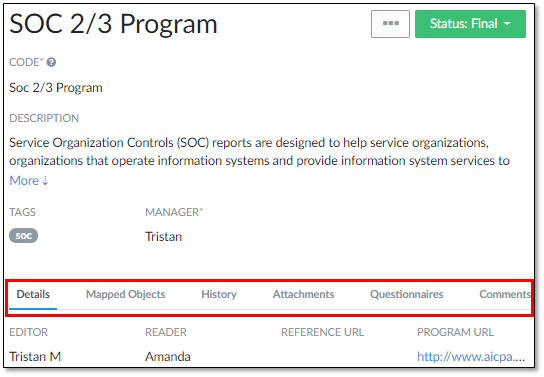
Details
All objects display a Details page, which is named after the default tab displayed when an object's Title is clicked. This tab contains information such as notes, start dates, and any applicable URLs.
NOTE
Most of the information on this page can be edited. Please see Editing the Details Page.
Mapped Objects
The Mapped Objects tab provides the same detail and editing capabilities as the home page. In addition, the view can be filtered, sorted, customized and exported in the same manner as on the home page.
NOTE
For instructions on navigating and editing in the Mapped Objects tab, please see System of Record List Views documentation.
History
The History tab displays all edits and changes for the selected item. It cannot be edited or sorted.
Attachments
The Attachments tab allows the upload of documents or the addition of hyperlinks. This is where evidence is added for requests, which means it's also the tab where assessors review uploaded documents.
Questionnaires
The majority of ZenGRC modules display a running history of surveys sent, along with the ability to send new surveys. And when surveys are returned, they are then linked to the responses.
NOTE
For instructions on surveys, please see Questionnaires.
Comments
All modules feature a Comments tab. This is where people make note of any decisions or updates on the item.
Editing the Details Page
To edit information on a details page, complete the following steps:
Hover over the desired field. A blue pencil displays to the right of the field
Click the blue pencil. A dialog box displays that differs depending upon the field selected for editing..

TIP
The majority of fields are editable, even if they do not appear to be. To discover the editable areas, hover over each field. If a blue pencil displays, the field is editable.
- Make the changes.
- Click Save.
- Alternatively, click Cancel to close the dialog box without saving changes.
Adding an Attachment or Link
To add an attachment or hyperlink, complete the following steps:
- If the Attachments area is not already displaying, select that tab.
- Drag files from your computer into the field under the Attachments tab.
- Alternatively, click click to browse to open a dialog box and select the files.
- To add hyperlinks to the request, click Click here to attach links.

- Add the URL in the Link text box and the name in the Title text box.
- Cick Add link.
NOTE
If you're using ZenGRC's native S3 storage solution, the maximum filesize for attachments is 4GB.
Deleting Attached Documents and Links
To delete an attachment or hyperlink, complete the following steps:
If the Attachments area is not already displaying, select that tab on the details page. All links and added files display together when the Attachments tab initially opens.
Click Delete beside the item you want removed.

- In the confirmation dialog box, click OK to confirm the deletion.
Alternatively, click Cancel to close the dialog box without saving changes.
TIP
To differentiate between links and attached files, note that the imported files are shown with file extensions, such as .CSV or .doc, while the added links display text entered in the link's Title text box when the link was added.
Reading a Comment
The display of a red balloon icon on the home page indicates an unread message. Once the linked Title is clicked and the details page displays, the comments are considered read.
TIP
When a comment is read, the red balloon icon reverts to gray for the user who opened the item.
Working With Comments
TIP
All ZenGRC items now trigger instant notifications when a comment is added on the Comments tab.
Adding a Comment
To add a comment, complete the following steps:
- On the details page, click the Comments tab.
- Enter information in the text box.
- Click Send.
- Alternatively, click ctrl+enter or cmd+enter on a mac within the text box to automatically save the comment.
Editing a Comment
To alter a comment, complete the following:
- Click the ellipses.
- Select Edit and update text.
- Click Save.
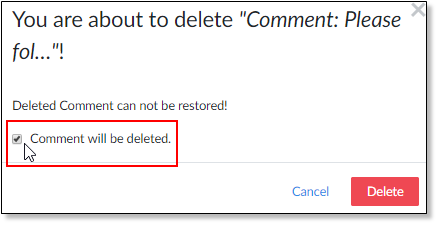
Deleting a Comment
To remove a comment, complete the following:
- Click the ellipses.
- Select Delete.
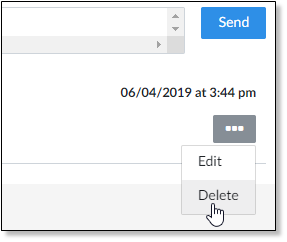
- Select the Comment will be deleted check box and click Delete. Deleted comments cannot be recovered.
Sending an Immediate Comment to Specified Users
To specifically call out users in a comment, complete the following steps:
- In the Comments tab, click the @. This opens a selection that displays active users in the instance.
- Select one or more user.
- Write your comment and click Send. This instantly sends an email to the specified user.
Reviewing a Comment Where You're Mentioned
To review an @mention you receive in an email, complete the following steps:
Open the email containing the comment.
Click Open in ZenGRC. This opens the item in the Comments tab where you can respond.
Navigating with the Keyboard
ZenGRC allows for certain keyboard shortcuts to be used. They include the following:
- Click tab to move the selector one space forward and shift+tab to move it one space back. Click the space bar to activate a component and then enter to select it.
- Click esc key to cancel an action. If you're inside the left-hand navigation sub-menu, click esc to close.
- When filling out a form, click ctrl+enter or cmd+enter on mac, to submit that form.
© 2021 Copyright Reciprocity, Inc.
https://reciprocity.com