System of Record List Views
Overview
The System of Record contains all objects available in ZenGRC. The objects are grouped into categories, and each object has it's own dedicated list view where you can set filters, determine how list data is displayed, and take bulk actions on the list data.
There are several actions that can be done directly on an item's System of Record list view. If you understand how to customize the list views, it will assist you in performing bulk activities and other organizational endeavors.
For example: If you want to change the due date on all requests associated with a particular audit, you could do that on the Requests home page. You would add the Due Date and Audit headings, filter by audit, select all results, and bulk edit the date. You will find all of those actions in this tutorial.
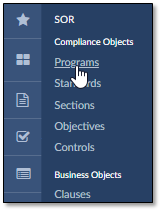
Accessing the System of Record
To access the list view of any topic in your System of Record, complete the following:
- Click System of Record in the left-hand navigation.
- It opens to display all objects available in ZenGRC.
- Select a sub link, and the home page for that object displays. The listing of items is sometimes called a list view.
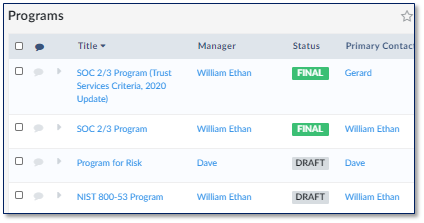
Adding and Removing Headings
It is important to understand how to add a heading to any area displaying a list view. Once a heading is added to the page, there are options that become available for bulk editing and mapping. In addition, the only way to export information is when the heading is displaying on the page.
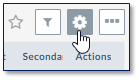
To change headings that display at the top of a module's home page, complete the following steps:
- In the top right of the page, click the gear icon.
The Set Up Table Columns select box displays with heading options. Asterisks denote mandatory columns.
TIP
Headings outlined in blue are those that display in the list view. To quickly add or remove multiple headings, select or deselect the check boxes before Attributes, Custom attributes or Mappings.
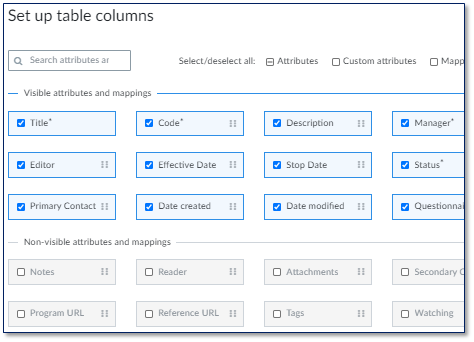
- To add or remove a heading, click the name or drag it to the visible or non-visible area.
- Click Apply. The new selections display in the page's headings.
Alternately, click Reset to defaults to close the dialog box and display the following headings:
- Title
- Description
- Manager
- Status
- Primary Contact
Sorting Data
To sort data displayed on a module's home page, complete the following steps:
- Hover over the heading you want to filter. This highlights the heading and displays the sort and filter icons.

- Click the arrow icon to sort the column in an ascending or descending order.
Filtering Data
This option enables users to filter data based on existence of mappings which then allows for gap analysis.
To filter data displayed on a module's home page, complete the following steps:
- In the top right of the page, click the filter button.
- In the first drop down, select an attribute or mapping.
- Next, select the operator and the value in the next drop downs.
- When adding multiple filters you can also select between the "ADD" and "OR" operators
- In the Attribute / mapping drop down, select from one of the following:
- Contains
- Does not contain
- Equals
- Does not equal
- Is Empty
- Is not Empty
- In the Value text box/drop down/date picker, enter or select the pertinent filtering information.
- To add additional filters, click Add New and make selections for the next group of attributes. You can make a filter group by clicking on the + button on the right side of the field.
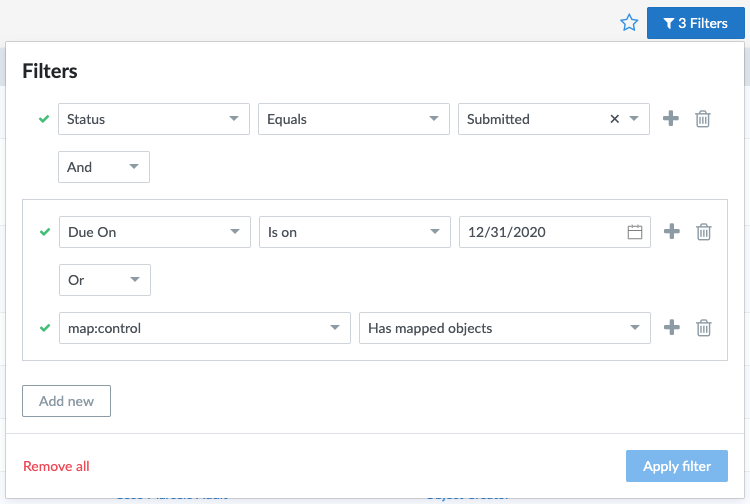
- Click Apply Filter.
- Alternatively, click Remove all to remove the filter.
In-Line Editing an Item
To edit an item's information directly the list view, complete the following steps:
- Hover over the column containing the information you wish to edit. A blue pencil icon displays.
- Click the pencil icon.
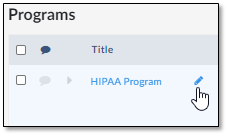
In the displayed dialog box, edit the item's attributes.
- Click Save.
- Alternatively, click Cancel or the x at top right to close the dialog box without saving changes.
Editing Multiple Items at Once ("Bulk Editing")
To conduct a bulk edit of multiple items on a list view, complete the following steps:
Select the checkboxes beside the items to be edited.
TIP
To select all items, click the checkbox in the heading. This selects or deselects all items displayed on the page. Change the rows per page in the bottom right to increase or decrease the selection number.
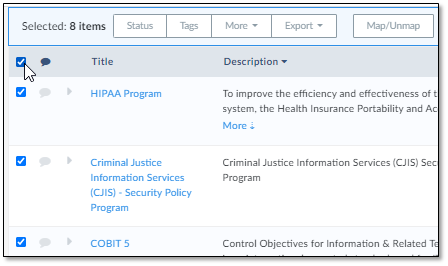
When more than one item is selected, a bar displays at the top with options distinctive to the column headers selected for the module.
To view additional columns, click More.
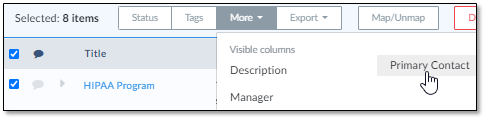
TIP
The headings displayed on the page are customizable. If the header you seek is not displayed in the bar for mass editing, it's because the heading isn't included in your setting selections. Follow the instructions under Adding and Removing Headings.
Select the item and make changes in the displayed dialog box.
- Click Save. Once saved, all changes populate the home page.
- Alternatively, click Cancel to close the dialog box without saving changes
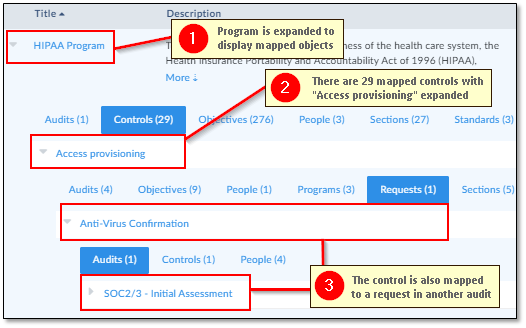
Utilizing the Tree View
The tree view provides a visual narrative of your compliance program with mappings between objects clearly displayed.
To display the tree view on a module's home page, complete the following steps:
Click the gray arrow next to an item.
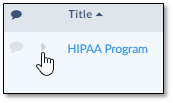
- Mappings to the item are displayed beneath.
- Continue selecting categories to view further mappings as shown in the following screenshot.
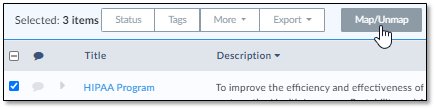
Mapping and Unmapping
First, select one or more items.
- Click Map/Unmap.
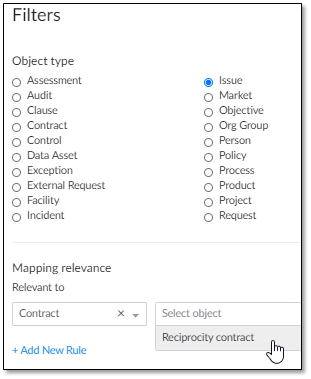
- Click Select object type.
When the Filter page displays, select the object to map. This is a radio button and only one can be selected.
- To further refine your search, click the dropdown arrow in the Mapping relevance filters and make a selection. This is an optional step and activates the Select object dropdown box. If you are searching for specific information, this returns results that match all criteria.
- Click Select and the Object Mapper displays. The Object Mapper is utilized in many areas of ZenGRC and is documented in Mapping and Unmapping Objects.
Exporting a CSV File
To export a CSV file with information from the headings displayed on a module's home page, complete the following steps:
- Check that the headings displayed match data to be exported.
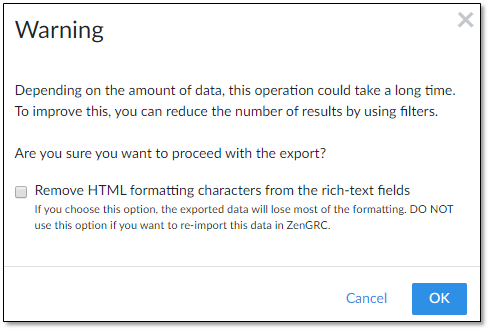
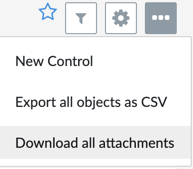
- Click Actions | Export all objects as CSV.

- In the displayed window, select the check box beside Remove HTML formatting characters from rich-text fields if the data being exported is solely for reporting purposes. You do not want to select this if the information is to be re-imported into ZenGRC. For complete information on this feature, please see Removing HTML From Exports.
- Click OK.
- The file downloads in the manner specified in the browser.
Downloading Attachments as a Zip File
To download attachments into a zip file, complete the following steps:
- Click Actions | Download all attachments.
- The file downloads in the manner specified in the browser.
© 2021 Copyright Reciprocity, Inc.
https://reciprocity.com